Wednesday, December 24, 2008

Convert Symbols to Entities using Word VBA

Word VBA Symbols to Entities Conversion Program


Symbols when converted to Text (Save as Text) seldom retain the original shape. It has been a practice to convert these symbols to entities (mostly the symbol name prefixed with an ampersand and followed by a semi colon), for example, α † etc


The following code expects a tab separated text file with symbol’s character code and its corresponding entity representation. For example


176 & degree;


945 & alpha;


To know about the corresponding character code for a symbol, you can use Alt + Symbol Key. For example Alt + 0151 will give an emdash etc


Or you can check from Insert -- > Symbol

Word Insert Symbol Dialog


We read the text file using FileSystemObject’s OpenTextFile (Refer )


Set oFil = oFS.OpenTextFile("c:\testasc.txt")


and uses the Split Function to convert each line to an array of two elements and iterate through the document


Sub Convert_Symbols2Entities()


Dim MyString


Dim arFindReplace


Dim oFS As Object


On Error GoTo Err_Found


Selection.HomeKey wdStory, wdMove


Set oFS = CreateObject("Scripting.FileSystemObject")


Set oFil = oFS.OpenTextFile("c:\testasc.txt")


Do Until oFil.AtEndOfStream ' Loop until end of file.


MyString = oFil.ReadLine


' Report if the Input is not Tab Separated


If InStr(1, MyString, Chr(9)) = 0 Then


Open ActiveDocument.Path & "\" & "SymbolsError.txt" For Append As 3


Print #3, MyString & " not replaced"


Close #3


GoTo TakeNext


End If


' Split the Input to Find & Replace Text


arFindReplace = Split(MyString, Chr(9))


' Report if ASCII Value is not valid


If Val(arFindReplace(0)) = 0) Then '' Then


Open ActiveDocument.Path & "\" & "SymbolsError.txt" For Append As 3


Print #3, MyString & " ASCII Value not valid"


Close #3


GoTo TakeNext


End If


Selection.Find.ClearFormatting


Selection.HomeKey wdStory, wdMove


With Selection.Find


.Text = ChrW(Val(arFindReplace(0)))


.Replacement.Text = arFindReplace(1)


End With


Selection.Find.Execute Replace:=wdReplaceAll


TakeNext:


Loop


LastCommands:


Close #1 ' Close file.


If Not oFS Is Nothing Then Set oFS = Nothing


Exit Sub


Err_Found:


' ----------------------------


' Error Handling


' ----------------------------


If Err <> 0 Then


Debug.Assert Err.Number <> 0


MsgBox Err.Number & " " & Err.Description & " has occurred", vbCritical, "ASCII Convert"


Err.Clear


GoTo LastCommands


End If


The code uses ChrW function, which returns a String containing the Unicode character except on platforms where Unicode is not supported


How to Show File Print Setup Dialog Box using Word VBA

The following code displays the Print Setup Dialog

Sub Show_PrintSetup()

With Dialogs(wdDialogFilePrintSetup)
.Show
End With

End Sub

Tuesday, December 16, 2008

How to check if Selection is Within a Table using Word VBA?

How to check if Range is Within a Table using Word VBA?

I was perplexed when LakshmiSatish, a wonderful copyeditor (and a great person) instructed some rules to be applied quite differently when a selected text is within a Table. Hats-off to copyeditors; you guys simply do a great job; I am afraid if the reader will know the hard-work you put. Enough musings! How to check if our Selection.Find is inside a Word Table? The following code makes that easy

Sub Check_If_Selection_Within_Table()

If Selection.Information(wdWithInTable) = True Then

MsgBox "Selection within Table"

Else

MsgBox "Selection outside Table"

End If

End Sub

Really easy isn’t it. There are also some other parts of Text that can be ignored. How ? Bookmarks is an easy way. We will deal with it soon.


How to set and reset track changes using Word VBA

Word VBA Set / Reset TrackRevisons
When you create a macro to do some operations that are not concerned with the content of the document, it is always advisable to do it without track changes. It is also better to turn-off the changes on screen as the deleted text might interfere with the process.
When you turn off the TrackRevisons and ShowRevisions, it is always best to leave them in their old state after the operation.
The following code does exactly the same
Sub SetAndReset_TrackRevisions()
Dim bTrackRevFlag As Boolean
Dim bShowRevFlag As Boolean
bTrackRevFlag = ActiveDocument.TrackRevisions
 bShowRevFlag = ActiveDocument.ShowRevisions
ActiveDocument.TrackRevisions = False
ActiveDocument.ShowRevisions = False
' Do Some Operations
Call TagDocument
ActiveDocument.TrackRevisions = bTrackRevFlag
ActiveDocument.ShowRevisions = bShowRevFlag
End Sub
The VBA code for autotagging the document switches off the tracking and resets them to their original position after the TagDocument subroutine is executed

How to Search a specific Colored Text (Range) using Excel VBA

Search Formatted Text using Excel VBA / Extract Colored Range using Excel VBA / Excel VBA Tag Color Text

The following code identifies the Blue Color text and ‘tags’ them

Sub Tag_Blue_Color()

Dim oWS As Worksheet

Dim oRng As Range

Dim FirstUL

Set oWS = ActiveSheet

Application.FindFormat.Clear

Application.FindFormat.Font.Color = vbBlue

Set oRng = oWS.Range("A1:A1000").Find(What:="", LookIn:=xlValues, LookAt:= _

xlPart, SearchOrder:=xlByRows, SearchDirection:=xlNext, SearchFormat:=True)

If Not oRng Is Nothing Then

FirstUL = oRng.Row

Do

oRng.Font.Color = vbautomatic

oRng.Value2 = "" & oRng.Value2 & ""

Set oRng = oWS.Range("A" & CStr(oRng.Row + 1) & ":A1000").Find(What:="", LookIn:=xlValues, LookAt:= _

xlPart, SearchOrder:=xlByRows, SearchDirection:=xlNext, SearchFormat:=True)

Loop While Not oRng Is Nothing

End If

End Sub

In the above code we have used

Application.FindFormat.Clear

Clears the criterias set in the FindFormat property and then set the format to find using

Application.FindFormat.Font.Color = vbBlue


Formatted Text in Excel (Colored)

Convert Colored Text to Tags in Excel
Convert Formatted Text to Tags in Excel, Tag formatted text in Excel

How to Search Italic Text (Range) using Excel VBA

Search Formatted Text using Excel VBA / Extract Italicized Range using Excel VBA / Excel VBA Tag Italic Text

The following code identifies the Italic text and ‘tags’ them

Sub Tag_Italic()

Dim oWS As Worksheet

Dim oRng As Range

Dim FirstUL

Set oWS = ActiveSheet

Application.FindFormat.Clear

Application.FindFormat.Font.Italic = True

Set oRng = oWS.Range("A1:A1000").Find(What:="", LookIn:=xlValues, LookAt:= _

xlPart, SearchOrder:=xlByRows, SearchDirection:=xlNext, SearchFormat:=True)

If Not oRng Is Nothing Then

FirstUL = oRng.Row

Do

oRng.Font.Italic = False ' Use this if you want to remove italics

oRng.Value2 = "" & oRng.Value2 & ""

Set oRng = oWS.Range("A" & CStr(oRng.Row + 1) & ":A1000").Find(What:="", LookIn:=xlValues, LookAt:= _

xlPart, SearchOrder:=xlByRows, SearchDirection:=xlNext, SearchFormat:=True)

Loop While Not oRng Is Nothing

End If

End Sub

In the above code we have used

Application.FindFormat.Clear

Clears the criterias set in the FindFormat property and then set the format to find using

Application.FindFormat.Font.Italic = True


Italic Formatted Text in Excel
Formatted Text replaced by Tags in Excel

How to Search Bold Text (Range) using Excel VBA

Search Formatted Text using Excel VBA / Extract Boldfaced Range using Excel VBA / Excel VBA Tag Bold Text

The following code identifies the bold text and ‘tags’ them

Sub Tag_Bold()

Dim oWS As Worksheet

Dim oRng As Range

Dim FirstUL

Set oWS = ActiveSheet

Application.FindFormat.Clear

Application.FindFormat.Font.Bold = True

Set oRng = oWS.Range("A1:A1000").Find(What:="", LookIn:=xlValues, LookAt:= _

xlPart, SearchOrder:=xlByRows, SearchDirection:=xlNext, SearchFormat:=True)

If Not oRng Is Nothing Then

FirstUL = oRng.Row

Do

oRng.Font.Bold = False ' Use this if you want to remove bold

oRng.Value2 = "" & oRng.Value2 & ""

Set oRng = oWS.Range("A" & CStr(oRng.Row + 1) & ":A1000").Find(What:="", LookIn:=xlValues, LookAt:= _

xlPart, SearchOrder:=xlByRows, SearchDirection:=xlNext, SearchFormat:=True)

Loop While Not oRng Is Nothing

End If

End Sub

In the above code we have used

Application.FindFormat.Clear

Clears the criterias set in the FindFormat property and then set the format to find using

Application.FindFormat.Font.Bold = True


Excel with Bold Formatted Text

Excel with Tagged Text (Format)

How to Search Underlined Text (Range) using Excel VBA

Search Formatted Text using Excel VBA / Extract Underlined Range using Excel VBA / Excel VBA Tag Underlined Text

One day a strange ‘job’ landed on my director friend M.A. Keeran. He had written a beautiful script for a film in Excel and has given for a second look. The guy who had done the second parse, underlined the parts of script that needs to be retained. Now we need to extract those ranges that have underlines. The following code is the modification/extension of that: it identifies the underlined text and ‘tags’ them

Sub Tag_UnderLine()

Dim oWS As Worksheet

Dim oRng As Range

Dim FirstUL

Set oWS = ActiveSheet

Application.FindFormat.Clear

Application.FindFormat.Font.Underline = XlUnderlineStyle.xlUnderlineStyleSingle

Set oRng = oWS.Range("A1:A1000").Find(What:="", LookIn:=xlValues, LookAt:= _

xlPart, SearchOrder:=xlByRows, SearchDirection:=xlNext, SearchFormat:=True)

If Not oRng Is Nothing Then

FirstUL = oRng.Row

Do

oRng.Font.Underline = XlUnderlineStyle.xlUnderlineStyleNone ' Use this if you want to remove underline in first column

oRng.Value2 = "

    " & oRng.Value2 & "
"

Set oRng = oWS.Range("A" & CStr(oRng.Row + 1) & ":A1000").Find(What:="", LookIn:=xlValues, LookAt:= _

xlPart, SearchOrder:=xlByRows, SearchDirection:=xlNext, SearchFormat:=True)

Loop While Not oRng Is Nothing

End If

End Sub

In the above code we have used

Application.FindFormat.Clear

Clears the criterias set in the FindFormat property and then set the format to find using

Application.FindFormat.Font.Underline = XlUnderlineStyle.xlUnderlineStyleSingle


Excel with Formatted Text (Underline)
Excel with Tags

Friday, December 05, 2008

How to use Connection events in ADO (VBA)

ADO Connection is associated with some interesting events. To consume the events, create a class and declare the Connection object

I have created a class called ClassXLApp and have created an object for Connection.

Private WithEvents CN As ADODB.Connection

WithEvents Keyword that specifies that varname is an object variable used to respond to events triggered by an ActiveX object. WithEvents is valid only in class modules. You can declare as many individual variables as you like using WithEvents, but you can't create arrays with WithEvents. You can't use New with WithEvents.

Select the Object name (CN here) in the Object Box. The Procedures/Events Box lists all the events recognized by Visual Basic for a form or control displayed in the Object box and will display all the events associated with connection


Click on any event to write the code associated with in the code window.

For example, let us use the following events

Private Sub CN_WillConnect(ConnectionString As String, UserID As String, Password As String, Options As Long, adStatus As ADODB.EventStatusEnum, ByVal pConnection As ADODB.Connection)

Debug.Print Now() & " Will connect"

End Sub

Private Sub CN_ConnectComplete(ByVal pError As ADODB.Error, adStatus As ADODB.EventStatusEnum, ByVal pConnection As ADODB.Connection)

Debug.Print Now() & " ConnectComplete"

End Sub

Private Sub CN_Disconnect(adStatus As ADODB.EventStatusEnum, ByVal pConnection As ADODB.Connection)

Debug.Print Now() & " Disconnected"

End Sub

Apart from the above three events, we can have two methods – one to connect to the database and one to disconnect from the database

Public Sub Connect2DB()

Set CN = New ADODB.Connection

CN.ConnectionString = "Provider=Microsoft.Jet.OLEDB.4.0;Data Source=c:\db1.mdb;Persist Security Info=False"

CN.ConnectionTimeout = 40

CN.Open

End Sub

Public Sub DisConnect()

If CN.State = adStateOpen Then

CN.Close

End If

If Not CN Is Nothing Then Set CN = Nothing

End Sub

Now let us use this class in any code module.

Sub ADODB_Connection_EXample()

Dim oCX As ClassXLApp

On Error GoTo ADO_ERROR

Set oCX = New ClassXLApp

oCX.Connect2DB

'''Code using database values

oCX.DisConnect

ADO_ERROR:

If Err <> 0 Then

Debug.Assert Err = 0

MsgBox Err.Description

Resume Next

End If

End Sub

We have created a connection and disconnected it. This will be fire the events in following order

12/4/2008 5:31:03 PM Will connect

12/4/2008 5:31:03 PM ConnectComplete

12/4/2008 5:31:03 PM Disconnected

Tuesday, November 25, 2008

Call a Method in VSTO Addin from Visual Basic Applications

How to call a VSTO Addin Function from VBA

VSTO Addins we write might contain good number of reusable components. The following article shows how to use them from external applications. This consists of the following steps:

1. Creating a VSTO Addin with a public method

2. Expose the VSTO Method for external use

3. Consume the VSTO Method from VBA

Creation of VSTO Excel Addin

Create a new project from Visual Studio - - > Office Projects - - > Excel 2007 Addin and call the project CallVSTOExample

This will automatically create necessary references and add required directives


VSTO Addin


using System;

using System.Runtime.InteropServices;

using Excel = Microsoft.Office.Interop.Excel;

Create a new C# Class module and add the following code to it

using System;

using System.Collections.Generic;

using System.Linq;

using System.Text;

using System.Runtime.InteropServices;

using Excel = Microsoft.Office.Interop.Excel;

namespace CallVSTOExample

{

[ComVisible(true)]

[InterfaceType(ComInterfaceType.InterfaceIsIDispatch)]

public interface IAddinVSTO

{

void SayHello();

}

[ComVisible(true)]

[ClassInterface(ClassInterfaceType.None)]

public class VSTOExample : IAddinVSTO

{

#region IAddinVSTO Members

public void SayHello()

{

Excel.Worksheet wks = Globals.ThisAddIn.Application.ActiveSheet as Excel.Worksheet;

Excel.Range myRange = wks.get_Range("A1", System.Type.Missing);

myRange.Value2 = "Hello";

}

#endregion

}

}

Here we have created one interface and have also created a class that implements the interface. The class has a simple method SayHello, which inserts “Hello” in cell A1 of active worksheet

The class must be public and should expose the IDispatch interface for it to be visible to COM

InterfaceIsIDispatch indicates an interface is exposed to COM as a dispinterface, which enables late binding only.

Exposing the method for external use

Add the following code to ThisAddin class

private VSTOExample utilities;

protected override object RequestComAddInAutomationService()

{

if (utilities == null)

utilities = new VSTOExample();

return utilities;

}

RequestComAddInAutomationService method returns an object in your add-in that can be used by other Microsoft Office solutions.

Override this method to expose an object in your add-in to other Microsoft Office solutions. This includes other add-ins and document-level customizations running in the same application process, VBA code, and external automation code.

The object that you return must be public, it must be visible to COM, and it must expose the IDispatch interface. If the object you return does not meet these requirements, the Visual Studio Tools for Office runtime will throw an InvalidCastException after it calls your implementation.

Compile the code and open the application (Excel) with the addin installed.

Excel VBA Code to call VSTO Method

The VSTOAddin that was created will be loaded as a COMAddin in Excel. The following code will retrieve the addin information

Sub Execute_VSTO_Addin_Macro()

Dim oAddin As COMAddIn

Dim oCOMFuncs As Object

Set oAddin = Application.COMAddIns("CallVSTOExample")

Set oCOMFuncs = oAddin.Object

oCOMFuncs.SayHello

End Sub

The Object property returns the object represented by the specified COMAddIn object. The VSTO function SayHello is called using the COMAddin’s object as shown above

See also:

Insert Array to Excel Range using VSTO

Create Custom Task Panes for Word using VSTO

Office host applications and their support for add-ins

Copy Array Values to Excel Range using VSTO

Insert Array to Excel Range using VSTO

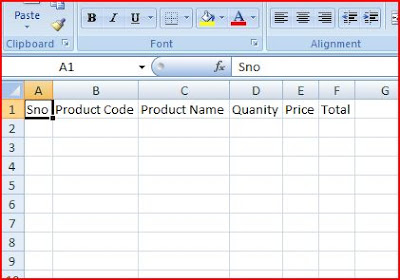
Many times we need to insert text to a contiguous Excel range using VSTO (like column headings). The following code does exactly that

private void InsertHeading()

{

string[] Header = { "Sno", "Prouct Code", "Product Name", "Quanity", "Price", "Total" };

Excel.Worksheet sht = Globals.ThisAddIn.Application.ActiveSheet as Excel.Worksheet;

Excel.Range myHeader = sht.get_Range("A1", "F1");

myHeader.Value2 = Header;

myHeader.Columns.AutoFit();

}

VSTO Code Output - Autofit columns

See also:

How to use .Net Array.Sort Function in VBA

Convert Dates to Arrays using Array Function

Array Dimensioning in Visual Basic

Filtering Array Elements

Transferring array to Excel range

How to Return Multiple Values from a VBA Function

Return Multiple Values from a Visual Basic Function


A normal VBA function has a return statement that returns a value to the calling function/subroutine

If you want multiple values to be returned, use reference parameters. The reference parameter represents the same storage location as the argument variable and hence changes made in the function is reflected in the calling function too.

Sub ReturnMultipleValue()

Dim L As Double

Dim B As Double

L = 10

B = 6

Debug.Print L & " " & B

ChangeLengthAndBreadth L, B

Debug.Print L & " " & B

End Sub

The above sub passes the arguments to ChangeLengthAndBreadth function by reference. That is, the storage location is passed to function and the changes made inside the ChangeLengthAndBreadth function is reflected in the main method.

Function ChangeLengthAndBreadth(ByRef Length As Double, ByRef Width As Double)

Length = 1.2 * Length

Width = 1.2 * Width

End Function

Multiple Return Parameters in VBA, Multiple Return Parameters in Visual Basic, Return Multiple Values – VBA Function, VBA Function to return more than one value


Return Multiple Values

See also:

Output Parameters in C# (.NET)

How to get the return value from C# program (console application)
Related Posts Plugin for WordPress, Blogger...
Download Windows Live Toolbar and personalize your Web experience! Add custom buttons to get the information you care about most.